I have been so busy with my kids that scrapping has taken a back seat. I just posted July and August template challenge at ndisb.com
Both templates are FREE until Aug 11! Stop by and get pick them up.


 ~
~  ~
~  ~
~ 




I have been so busy with my kids that scrapping has taken a back seat. I just posted July and August template challenge at ndisb.com
Both templates are FREE until Aug 11! Stop by and get pick them up.
My Template Challenge is up and posted at NDISB.com My Templates will only be FREE for 1 week from the time they are posted, so head on over to my store and grab it now!

In case you are wondering no I didn't fall off the planet, I had a baby!
Alexander Lucas was born at 34 weeks gestation via emergency c-section on November 3, 2011.
I created this video of the my pregnancy and the birth of Alexander.

check out my new template challenge at NDISB this month.

Sept came in with a BANG over here with Hurricane Irene and we've been flooded over here on the east coast. I was very slow getting up my September Template Challenge, but it's up and ready now!


Hello Everyone!
I will be hosting a Template Challenge each month at NDISB.
To join me just download the FREE template from my store and create a layout with it.
It's only FREE until June 30th. Template is available in psd and png formats!

Here's the layout I created using the template:

And here is some inspiration:
from scrapdragon

from Susan

Upload it to the Contests and Challenges gallery and post it the challenge forum. Don't forget to post your points in the tracking thread.
Challenge reminders:
- 1 point for completing the challenge
- 1 additional point for using only NDISB products
- 1 additional point for the layout that is selected as the outstanding entry from this challenge
- 1 additional extra point if a newly-released NDISB product is used
- You have until June 30 to finish this challenge
Every 3 points equals 1 NDISB store dollar. Coupons will be provided at the end of each month. Unused points will carry over to the next month.
Don't forget NDISB is having a CT call and I'm looking for a creative team also!


My very first TUT - Working with a Template.
I've been taking workshop classes at Digi Scrapbook Mania and telling my sister-in-law Susan (hi Susan I know you read my blog) about them. She said it sounded like she could even learn something from these workshops.
Today we had to work with a template - which I've done several hundred times but I was surprised to see how many others hadn't. So I'm going to give you a quick lesson in using a template QUICKLY and more efficiently with short cuts. ((Mac users I don't know your short cut keys, but hopefully you can figure it out))
First here's a FREEBIE a Template called LOVE in psd format only. I created this layout for a clustering workshop so I turned it into a freebie since so many people gave me such wonderful feedback.
here's my layout:
The kit I used is called Pimp My Picture by Dilo Designs the font I used is called Mr. and Mrs. Popsicle from Kevin and Amanda's Fonts
Remember I'm giving you my Fun Colorful Alpha if you use something I've made and credit me. click here for more details. Hey Kacy keep reading cause I can help you play along too!
Preview of the Template
Download HERE
Now on with the tutorial
opening the "Teaching Template and follow along with me
since I already listed credits for Pimp My Picture by Dilo Designs I am going to continue working with that kit.
You can see that I have Photoshop Elements open with the folder of the kit next to it. That way I can see all the elements and papers and easily drag what I want over into Elements.
If you've never done that before just CLICK AND HOLD on the paper or element you want, then drag it right over into elements. Your cursor will have a little + under it as you are dragging it over. It does take some getting used to if you've never done it before.
Now that we have the paper in Photoshop, I'm going to click on the background layer of the template so when I drag over the paper it will be on top of the layer I want it.
By holding the SHIFT key when I drag it, it places that paper dead center.
Next I'm going to select another paper from the folder and drag it over also
Click on the layer that you want this paper to be, drag it onto the template. if you hold SHIFT down while you drag it will place the paper in the center.
You should have the hang of the dragging into Photoshop and dragging onto the template now. It takes some practice if you haven't done it before, but its much faster than clicking on File>Open>Look In
Now I want to "clip" or "group" that 2nd paper, with the layer. all you do is hold Ctrl and hit the letter G (Ctrl+G) POOF the paper is now clipped with that layer and LOOK it even has a shadow already because it's on the template layer!
Next I like to make my clipping permanent, because sometimes you accidentally move your grouped layer. By clicking Ctrl + E you will merge the clipping layer to the template layer.
the clipping and the merging comes in so handy if you are using a template with multi photo or paper areas. Or if you want to whip up a template quickly!
Lets continue to drag over a paper and clip it on the 3 other layers called papers. And if you don't like the papers you selected you can always drag over more and clip and merge until you're happy with how it looks.
Also before you "merge" you can move around the clipped paper to decide how you want the pattern to look.
here I have the 2nd block showing the pattern paper one way
and here I moved it around a little
I like the 2nd one, so I'm going to merge it now Ctrl+E
You also can see when you merge it that the Bounding Box changes size, since the paper is no longer 12x12
I finished my paper clippings, so I'm moving onto my swirl in the back. Maybe I'll use a swirl, maybe a paint splatter that's the great thing about templates - someone else did the composition for you so you just have to place the elements you like best!
Here I placed the swirl, it's still in it's original size. Please please please remember to RESIZE YOUR ELEMENTS! I see so many layouts with GIANT buttons or ribbons. Think about it this way, would you wear a shirt with giant buttons like that? No so why should your layout have to suffer?
Hold down the ALT key to resize any paper or element while maintaining the correct proportions.
You can already see that the smaller swirly is more pleasing to the eye. Then again you might be someone who likes the giant elements... My @$$ is giant enough so I make my elements smaller!
I did a little rotation of the swirl and hid the template's swirl layer. Now I can see that there seems to be an empty space after I hid that swirl layer. What do you think?
I'm going to duplicate that swirl layer. Fast way is to click Ctrl +J! I made the 2nd swirl a little smaller by holding Alt when resizing and rotated it. I am pleased with how that looks.
Moving onto the flowers
Drag over any flower you want to use, using the steps above. click on the flower layer so your flower element will be placed above that flower. You don't need to hold shift down to make it center, you can just drag the element and aim for that area on the template you want the flower to show up.
Sometimes I notice PSE gets a little freaky and will drop your dragged element to the center if you are holding shift or not, so don't worry if that happens.
And don't forget to resize!! Look how crazy big this flower looks in the original size! Designers create their elements larger because you get a higher quality product.
I'm using one flower so I hit Ctrl+J to duplicate it two more times. I moved the 2 other flowers over to the flower location on the template. I also rotated my little flowers so they each look a little different
Now here's a cool little thing. I don't feel like messing around with the shadows. What the template came with is good enough for me. Right click on the template's flower and a menu will show up. Move down and select "Copy Layer Style"
Move up to your flower element and right click on that and select "Paste Layer Style"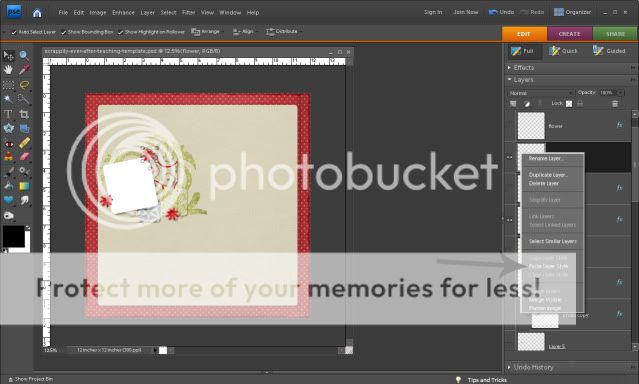
Do that with all 3 flowers, and make sure you hide the template's flower layers by clicking on the eyeball for that layer.
Time to add my current favorite photo of me with my son. I do the same thing, open my photos in the folder and drag over the picture into PSE. Then drag the photo onto the template. Rotate it a little to be the same angle as the photo layer, resize it, group it, merge it.
Do final tweaking to the layout. I changed the flower sizes and position then added a splatter over the swirls.
Now for those of you like Kacy who do not want to have their photos on the web... after you resize the photo to 600X600 so you can upload it to most digi-galleries, just blur out the photo! if you are a scrapper and you aren't participating on a scrap website out there you are missing out on a lot of knowledge and freebies!
here's how to blur
Ctrl+J to duplicate your photo. Go up to Filter>Blur>Gaussain Blur and set the blur to a little over 50%. This will blur out the faces and places just leaving enough to make out that there is a figure in the picture.
Group Ctrl+G your Blurred photo to your non blurred photo so you can still see the drop shadow.
And please non of this alien looking blurring of the eyes, it's creepy!
I really hope this helps some of you out there and gets Kacy on some sites!
Please let me know if this helped you! Enjoy the templates


